I'm trying something new. I'm going to post our menu for the week on Sundays. I don't know where it'll go but you'll have an idea of what (and maybe how much) I am feeding this large group- at least for dinner. Just go with me on this one! Hahaha.
Sunday- Chicken Salad (using left over pieces from the bulk bags I used this week, so 1 large breast and a small handful of strip pieces.1 and a half salad mix bags, yes I know I'd save buying heads but I get the bags with the extra veggies in them and on those I would not save so with the bag I go. Dressings of choice and croutons.)
Monday- DH is making a Pork Roast (3.6 lbs) in the crock pot- he's keeping the ingredients a secret but I'm sure it'll be yummy. He then plans on pulling it and making sandwiches. Serving with chips and veggies with ranch dip- again my DH's recipe.
Tuesday- Cheese burgers (we use 3 lbs of hamburger) with streak fries and mixed veggies- both frozen and a whole bag of each. We'll use a 12 pack of buns. (It's P's turn to cook, this is the meal she choose.)
Wednesday- Chicken Drumsticks cooked in the crock pot in teriyaki sauce. Serving with jasmine rice (2 cups uncooked) and frozen Asian stir fry veggies.
Thursday- Italian Pasta Salad. I got the recipe off a Google search. We'll demolished the whole thing.
Friday- Ginger and Garlic Beef (sandwich steak about 2 lbs- cut into strips and cooked in the crock pot). with teriyaki noodles and broccoli and cauliflower.
This is what we're eating for the week. What's your plan?
Showing posts with label Cooking. Show all posts
Showing posts with label Cooking. Show all posts
Sunday, May 29, 2011


Friday, March 4, 2011
On My Mind
Inspired by Rhonda over at Down To Earth, this is my Friday photo of "On My Mind".
On my mind today: How to cook a whole chicken in the crock pot. I love to bake whole chickens- my family loves it when I make them but I'm not really into wanting to bake one lately. 6 weeks postpartum and 2 under 2 make my days way too long to put that energy out there at the end of the day. Soooooo I thought I'd try one in the crock pot. I mean I know I can do it but the thought of cooking it "wet" (adding liquid to the crock pot) seems really gross to me. But I found directions online (another blog) on how to without the wet. We'll see how it turns out and I'll update tomorrow with my family's reaction (and my own- cause I am my own worst critic! LOL) and pics of the finished product.

I followed the directions on the other blog. For my spices I used- a Red Pepper and Garlic mix, Salt, Lemon Pepper mix, and more straight Garlic. (Oh a tip! Remember to turn ON the crock pot! LOL)
Also ALWAYS on my mind.....A new pic of Baby J! 6 weeks yesterday! It goes by so fast!

On my mind today: How to cook a whole chicken in the crock pot. I love to bake whole chickens- my family loves it when I make them but I'm not really into wanting to bake one lately. 6 weeks postpartum and 2 under 2 make my days way too long to put that energy out there at the end of the day. Soooooo I thought I'd try one in the crock pot. I mean I know I can do it but the thought of cooking it "wet" (adding liquid to the crock pot) seems really gross to me. But I found directions online (another blog) on how to without the wet. We'll see how it turns out and I'll update tomorrow with my family's reaction (and my own- cause I am my own worst critic! LOL) and pics of the finished product.
I followed the directions on the other blog. For my spices I used- a Red Pepper and Garlic mix, Salt, Lemon Pepper mix, and more straight Garlic. (Oh a tip! Remember to turn ON the crock pot! LOL)
Also ALWAYS on my mind.....A new pic of Baby J! 6 weeks yesterday! It goes by so fast!

He's my kitchen companion (as it's the safest place in the house for him. The baby gate keeps big brother C away!), maybe he'll turn out to be a cook like Da! :D
Update!
(The Bird After!)
The bird turned out great! I will be doing this again. It was very moist and flavorful. The meat literally fell off the bone- I love it when it does that. And as an added bonus it was very easy to continue on with the directions for making broth and tomorrow I'll be making home made chicken noodle for dinner! And there's plenty of chicken leftovers to get another whole meal for our large family. So 3 meals out of one bird!
Wednesday, December 8, 2010
Holiday Treats 5!
Number 5 today. Let's see......what should I pick......?????? Gingerbread? Poppy seed bread? PB Kisses? Mounds Bars? The choices are many but I am starting to worry I won't be able to come up with all 15~ I will do it! I will! Choices choices choices. Okay number 5~ oh fudge....

OH Fudge!
Ingredients:
3 cps semisweet chocolate chips
1 (14 oz)can sweetened condensed milk
1/4 cp butter
1 cp chopped walnuts (opt)
1.Place chocolate chips, butter and sweetened condensed milk into in large microwavable bowl. Zap in microwave on medium until chocolate chips are melted, about 3-5 mins, stirring once or twice during cooking. Stir in nuts, if desired.
2. Pour into well-greased 8x8 glass baking dish. Refrigerate until set.
Makes 16.
A few other optionals you can try:
- adding 1/2 tsp mint extract for a chocolaty-minty treat! Peppermint would be a nice holiday flavor.
-Sprinkle powder sugar over the top for a more formal look.
-add bits (very small bits) of dried cherries for a cherry cordialish taste.
-be creative! by use small amounts so the fudge is not over powered by the extras! Fudge in itself is a prize!
Monday, December 6, 2010
Holiday Treats 4!
Number 4! Again another that calls for a special tool to make but with these its not necessary- just makes them cute and fun for the kids to help out even more! We had a hard time keeping the sprinkles on these until a few years ago when my mom saw a tip- corn syrup! (yeah I know let's add MORE sugar! But hey this is for a special occasion and it's ok to indulge sometimes.) So the trick- warm a bit of corn syrup and brush over the top of cooled cookies and then add the sprinkles. They stick like glue! This also works for frosted, decorated, finished cookies (the ones the kids put so much time into making personal!)- again just brush on warmed corn syrup over the the frosting and it creates a seal much like store bought versions, and then add the extras (eyes, nose, sprinkles, red hots, gum drops- what ever sparks your fancy!). So number 4.......
Spritz Cookies!

Ingredients:
1 lb butter (don't use substitutes!)
1 cp sugar
2 eggs
2 tsps vanilla extract
4 cps flour
1 tsp baking soda
1. In a mixing bowl cream butter and sugar. Add eggs, one at a time, beating well after each, and vanilla.
2. In separate bowl- combine flour and baking soda; add to creamed mixture and mix well.
3.Shape with cookie press (if you don't have a cookie press- as I don't, I usually make these w/my mom who does have one BUT have made them alone- you can just to a small drop cookie of dough, flatten slightly with a fork). Place on ungreased cookie sheet. Bake at 325* F for 12-15 mins or till light brown. Cool, decorate as desired.
Makes about 66 small spritz. These usually come out as one biters! So make lots....they go fast, with all their sweet buttery goodness!
Holiday Treats 3!
Number 3 is the one that was eaten last by us kids but first by the adults. The Grandmother made these every year, and thou this is not her recipe (I don't have it but when it I get it from my mom I'll share- if it's not a family secret ;)! ) I got this one off the internet.
Divinity!

Ingredients:
2 2/3 cps white sugar
2/3 cp corn syrup
1/2 cp water
2 egg whites
1 tsp vanilla extract
2/3 cp chopped walnuts (opt)
1. Cook sugar, corn syrup, and water in a 2 qt. pot over low heat, stirring constantly, until sugar is dissolved. Cook, without stirring, to 260 degrees on candy thermometer (or hard ball stage).
2. Beat egg whites in a 1 and 1/2-qt bowl till stiff peaks form. Continue to beat while pouring hot syrup in a thin stream into egg whites. Add vanilla; beat till mixture holds its shape and becomes slightly dull. (Mixture may become too stiff to use electric mixer.) Fold in nuts (optional).
3. Drop from buttered spoon onto waxed paper. Let stand at room temperature, turning candy over once, until outside of candy is firm- at least 12 hours. Store in airtight container.
Makes about 48.
My grandmother (I believe) added food coloring to some- giving it a pastel color. Greens and pinks mostly (this would mostly likely be done at the time you add the vanilla). Also I've seen a few recipes that use pecans instead of walnuts, if you prefer one over the other.
Sweet and teeth rotting! Makes it sooooo good!
Divinity!
Ingredients:
2 2/3 cps white sugar
2/3 cp corn syrup
1/2 cp water
2 egg whites
1 tsp vanilla extract
2/3 cp chopped walnuts (opt)
1. Cook sugar, corn syrup, and water in a 2 qt. pot over low heat, stirring constantly, until sugar is dissolved. Cook, without stirring, to 260 degrees on candy thermometer (or hard ball stage).
2. Beat egg whites in a 1 and 1/2-qt bowl till stiff peaks form. Continue to beat while pouring hot syrup in a thin stream into egg whites. Add vanilla; beat till mixture holds its shape and becomes slightly dull. (Mixture may become too stiff to use electric mixer.) Fold in nuts (optional).
3. Drop from buttered spoon onto waxed paper. Let stand at room temperature, turning candy over once, until outside of candy is firm- at least 12 hours. Store in airtight container.
Makes about 48.
My grandmother (I believe) added food coloring to some- giving it a pastel color. Greens and pinks mostly (this would mostly likely be done at the time you add the vanilla). Also I've seen a few recipes that use pecans instead of walnuts, if you prefer one over the other.
Sweet and teeth rotting! Makes it sooooo good!
Holiday Treats 2!
Day 2 and one of my all time favorites! These are so light and delicious I could eat the whole batch by myself- hence why I want to do 2 batches this year! This is a traditional recipe for our family and also just plain fun to make- takes a bit of practice though! This cookie calls for a special iron to make- you can find them online pretty easily and sometimes in second hand stores or garage sales, but so worth it! And a great family heirloom to pass down to generations (along with the recipe and tradition of making these!).

(krumkake iron)
Krumkake (pronounced Krum-ca-ca) a Norwegian waffle cookie

Ingredients:
3 eggs
1/2 cp sugar
1/2 cp cold water
1/2 cp butter, melted and cooled
1/2 tsp vanilla
1 cp flour
1. Beat eggs with sugar until light. Add cold water, cooled butter, vanilla and flour. Stir till smooth.
2. Brush the krumkake iron with lightly melted butter. Heat the iron on the range top on medium-high heat.
3. Pour a generous tablespoon of batter on iron. Brown on one side and flip the iron over to brown other side. When the krumkake is evenly brown on both sides, quickly remove from iron and roll into a cylinder shape and place on a paper towel till cool. You can use the tool that comes with the iron or a knife or handle of a wooden spoon- anything that will give you the desired cone affect.
These can be filled with whipped cream or fruit. Or you can leave them plain- this is what I usually do! We have also in the past dipped the openings of the cones in chocolate and let it set.
Makes about 38- give or take since I usually have to play with timing and amount on the iron. Store in an air tight container to maintain crispiness.
Yum! Enjoy!
Sunday, December 5, 2010
Holiday Treats!
As in LOTS of families out there we make cookies, candy, sweets and the like traditionally each year for the holidays and I would love to put some of these down in writing for my kids. So to start and get them somewhere safe I'm going to post a recipe for one of the goodies each day till Yule. Some may be our traditional (Grandmother's recipe) and some may be a variation I get off the Internet but I hope all will be good! Hopefully at the end of this there will be 15 different recipes for sweets.
The 1st: Candy Cane Twists (we didn't make these every year but I do remember making them more than once and they're a great kid friendly cookie!)

Candy Cane Twists!
Ingredients:
1 cp unsalted butter, softened
3/4 cp sugar
1 large egg
1 1/2 tsps vanilla extract
1 tsp peppermint extract
1/4 tsp salt
2 1/2 cps flour
1/2 tsp red food coloring
1/2 tsp green food coloring (this is opt. we usually only made red and white candy canes)
1. Using an electric mixer set on med-hi speed, cream the butter. Continue beating and gradually add the sugar.
2. Beat in the egg until evenly mixed, then add the vanilla extract, peppermint extract, and the salt, and blend well.
3. Use a wooden spoon to stir in the flour, one third at a time, until evenly mixed.
4. Divide the dough into thirds. (Or 1/2 if just using red and white) Add the red food coloring to one third (or half) and the green food coloring to another (or not at all), then knead into the dough. Flatten each third (or half) into a 1/2-inch-thick rectangle, cover it in plastic wrap, and refrigerate until firm, about 30 mins.
5. Heat the oven to 375*. On a lightly floured surface, roll a pair of tablespoon sized pieces of contrasting colored dough into 8-inch long ropes. Twist them together, pinch the ends, then bend the cookies into a candy cane shape. Repeat with the remaining dough.
6. Bake the cookies on an ungreased cookie sheet until set but NOT brown, about 10 mins, rotating the sheet halfway through. Cool the sheets on a wire rack for 5 mins, then transfer the cookies to the rack to continue cooling.
Fun for the kids to help make! Yum!
Thursday, April 22, 2010
Vegetarian Adventures 2
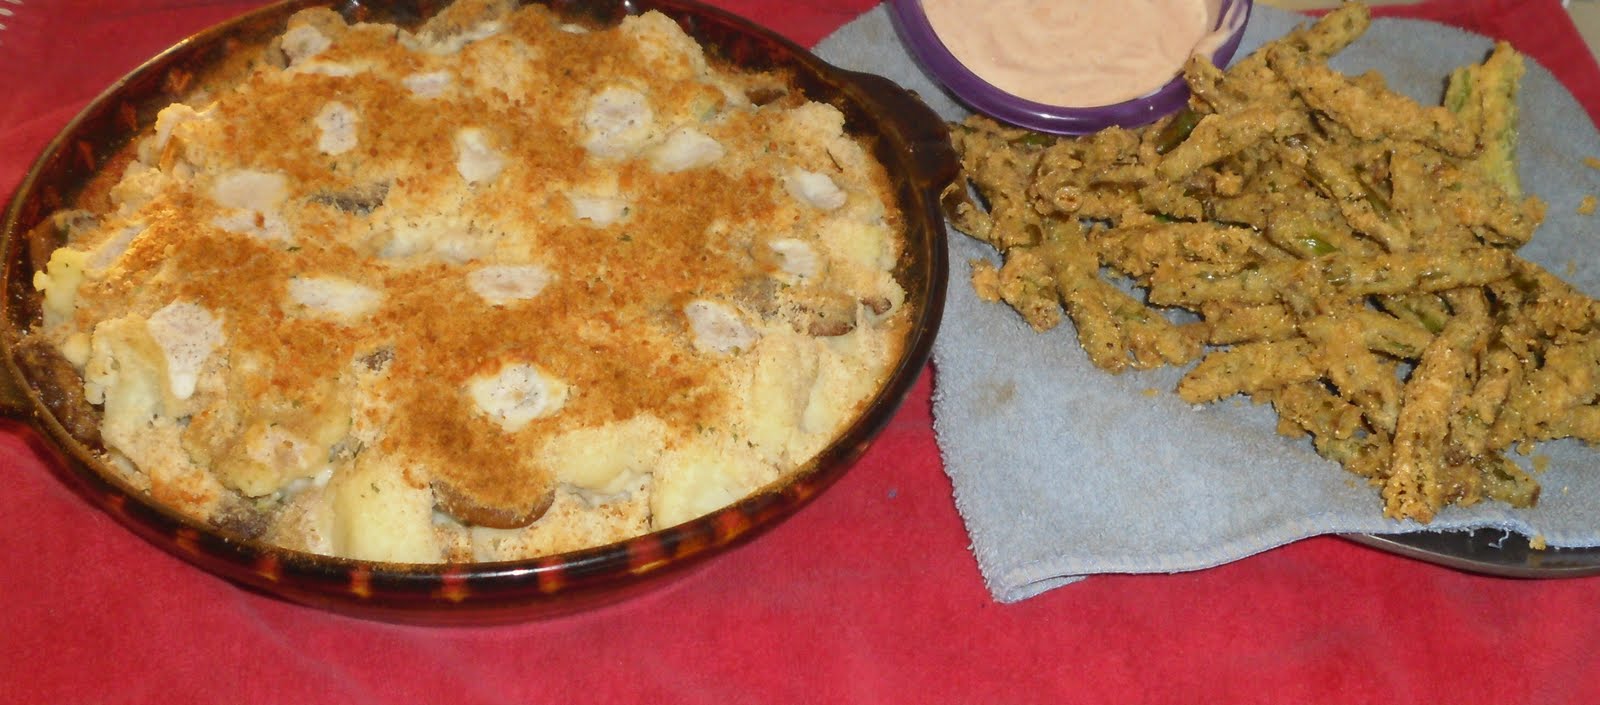
Success! Mushroom and Cauliflower Cheese Crumble was oh so yummy. My husband whipped up some fried green beans & Tapatio Ranch dip (spicy!) to go along with it and we topped it all off with croissants. The recipe says it feeds 4 but this dish is so filling I think we could feed all 8 of us easily.


We will be making this again soon. But we did find a few things to teak a bit. The recipe in the book calls for 1 and 2/3 cups of bread crumbs but this is just too much, the bread crumbs over shadow the whole dish. So next time I'm going to cut it down to just a cup.
Also grated Parmesan cheese is nice but we think it could use a bit more flavor. We're thinking some shredded Provolone will give it the bite we're looking for. But over all we're excited to try it again.

My husband's from Mississippi and fried food is the norm for him. He recently bought a fry daddy and is always looking for something to deep fry. Last night's green beans were fantastic!
He dipped the green beans first in egg and then into a mix of flour and corn meal, with creole seasoning for taste. Deep fried for about two or three minutes and perfection! The green beans were still crisp but hot!
So last night's meal was one to remember and will be added to the family's cookbook!
I'm sitting here drooling from the memories. Can't wait to try the left overs for lunch.
Tonight: Asparagus and Mozzarella Lasagna- a bit trickier since I have to figure out how to puree the asparagus with out a food processor! lol
Member
of
TheMomBlogs.com
Wednesday, April 21, 2010
Vegetarian Adventure!

So its been about a year since I've written here. Gonna mix it up a bit!
We, as a family, have decided to start a new adventure into vegetarian cooking. A few nights ago we made Tofu for the first time. Let's just call that a wash. We will be making it again sometime, we all enjoyed it uncooked, but somehow we cooked it wrong and the consistency was just WRONG! lol Next time we try it I think we're going to try grilling it.
But tonight! I am trying a new recipe from "Easy Vegetarian" published by Love Food- Mushroom & Cauliflower Cheese Crumble. I love mushrooms and it looks so easy! Now if the kids like it it'll be perfect. The plan is to make breaded green beans for the side and serve with a crusty bread.
I'll let you know how it goes tomorrow. And if it's a success post the recipe!
(*the pic at top is not the dish, just an example. I will be taking one of mine before savoring.)
Member
of
TheMomBlogs.com
Subscribe to:
Posts (Atom)